Trigger Points in the Lateral Pterygoid | Head and Jaw Pain
Trigger Points in the Lateral Pterygoid are a Common Cause of Head and Jaw Pain
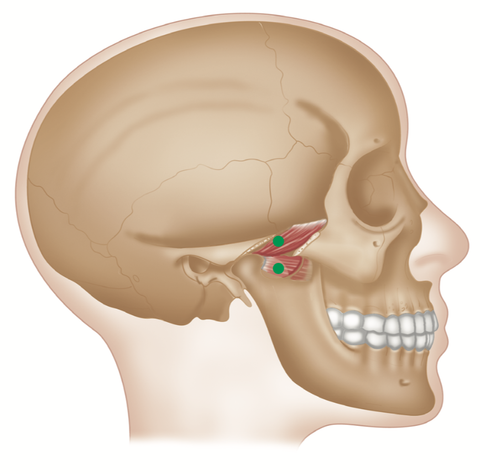
The superior head of the lateral pterygoid is sometimes called the sphenomeniscus, because it inserts into the disc of the temporomandibular joint.
ORIGIN
Superior head: lateral surface of greater wing of sphenoid.
Inferior head: lateral surface of lateral pterygoid plate of sphenoid.
Lateral Pterygoid Trigger Points
INSERTION
Superior head: capsule and articular disc of the temporomandibular joint. Inferior head: neck of mandible.
ACTION
Protrudes mandible. Opens mouth. Moves mandible from side to side (as in chewing).
NERVE
Trigeminal V nerve (mandibular division).
BASIC FUNCTIONAL MOVEMENT
Chewing food.

Lateral Pterygoid Trigger Points
REFERRED PAIN PATTERNS
Two zones of pain:
(1) TMJ in a 1 cm localised zone
(2) zygomatic arch in a 3–4 cm zone
INDICATIONS
TMJ syndrome, craniomandibular pain, problems chewing/masticating, tinnitus, sinusitis. decreased jaw opening, headaches, bruxism, sinusitis pain, trismus (lockjaw), tingling in cheek area.
CAUSES
Chewing gum, tooth grinding/ bruxism, prolonged dental work, stress, emotional tension, jaw/ bite alignment, nail biting, thumb sucking.
DIFFERENTIAL DIAGNOSIS
Arthritic TMJ. Anatomical variations of TMJ. Tic douloureux (trigeminal neuralgia). Shingles.
CONNECTIONS
TMJ, atlanto-occipital joint facets, neck muscles, masseter, medial pterygoid, temporalis (anterior), zygomaticus, buccinator, orbicularis oculi, SCM.
BITE PLATES/BLOCKS/ OCCLUSAL SPLINTS
Opinion varies as to efficacy, type, and duration of use for occlusal devices. An evidence base suggests they can be beneficial.
POSTURE
Head forward or upper crossover patterns can be treated by a range of manual and trigger point therapists.
ADVICE
Chew on both sides of mouth. Avoid gum chewing/nail biting. Bite guard, phone-in-neck postures.
SELF-HELP TECHNIQUE
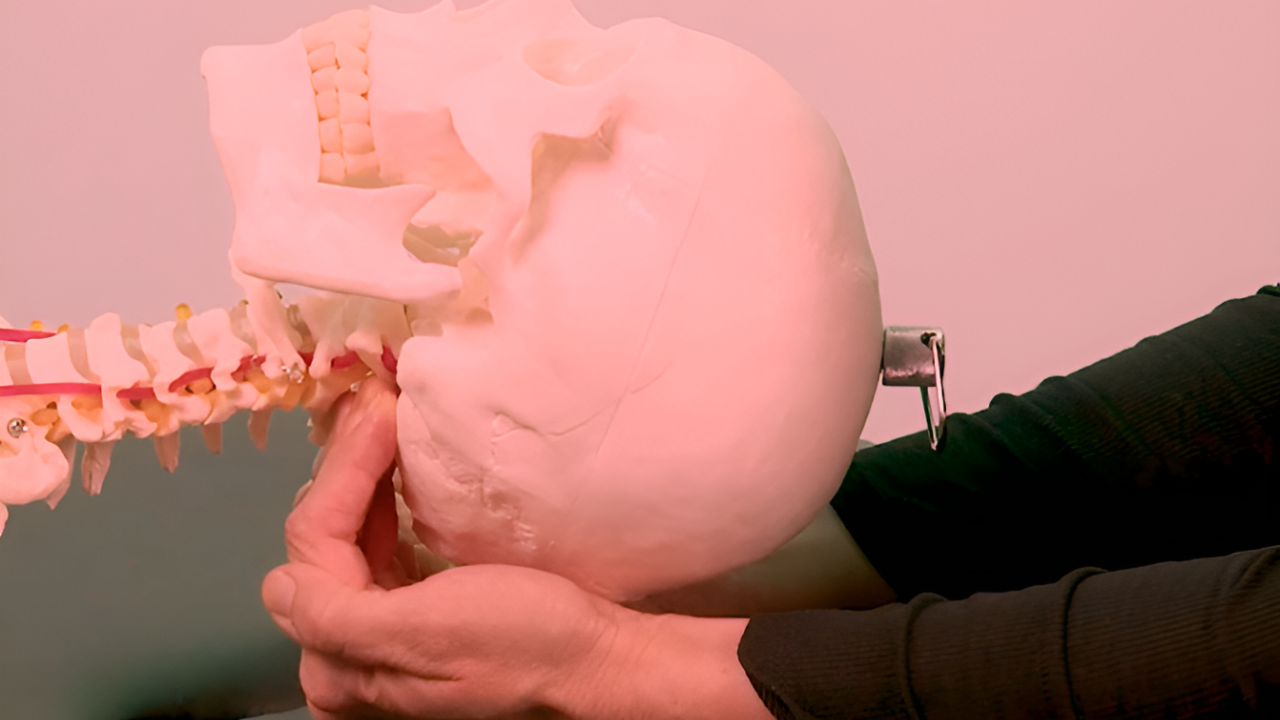
1. Use pincer-grip pressure techniques inside of the mouth in the sulcus, right at the back of the molars (or wisdom teeth if you have them); push inward and upward toward the top of the cheek.
2. Apply gentle and gradually increasing pressure to the trigger point, while lengthening the affected/host muscle until you hit a palpable barrier. This should be experienced as discomfort and not as pain.
3. Apply sustained pressure until you feel the trigger point soften. This can take from a few seconds to several minutes. Repeat, increasing the pressure on the trigger point until you meet the next barrier, and so on.
To achieve a better result, you can try to change the direction of pressure during these repetitions.
Useful Links on this Website
Ischemic Compression Technique (ICT)
Dry Needling for Trigger Points
This blog is intended to be used for information purposes only and is not intended to be used for medical diagnosis or treatment or to substitute for a medical diagnosis and/or treatment rendered or prescribed by a physician or competent healthcare professional. This information is designed as educational material, but should not be taken as a recommendation for treatment of any particular person or patient. Always consult your physician if you think you need treatment or if you feel unwell.
Learn More for Less

Unlimited access to all courses for just $19.95/mo
Popular Courses


See All Blogs
Common Back Pain - Disc Prolapse (Slipped/Ruptured/Herniated Disc)

Trigger Point Treatment - Serratus Posterior Inferior