
Ankle Sprain
An ankle sprain can occur to anyone at any age regardless of their physical fitness. Some sprain their ankle as a result of a fitness activity whereas others from simply stepping on an uneven surface and losing their balance.
The ankle joint and bones are held together by ligaments which prevent the ankle from twisting and turning in an abnormal fashion. The ligaments, which have an elastic structure, usually stretch but then return to their usual position. A sprain occurs when these ligaments are stretched beyond their usual range. A severe sprain is the result of ligaments actually tearing.
What are the Symptoms of an Ankle Sprain ?
The symptoms will depend upon whether you have stretched or torn the ligament - a tear being more painful than a stretch.
The worse the sprain, the worse the symptoms.
Most will feel at least one of the following symptoms:
- An immediate pain
- Swelling around the ankle
- Bruising
- A popping sound
- A tearing sensation
- Tenderness with touch
If you have torn a ligament or dislocated the joint of the ankle, you are likely to be de-stabilised as a result.
A major tear may render you unable to walk or apply weight to the foot. Often however, the pain will subside fairly quickly.
Who is Prone to an Ankle Sprain?
Anyone who has sprained their ankle in the past where the ligaments did not have a chance to fully heal, will be more prone to twisting their ankle again.
If you regularly walk on uneven surfaces or are involved in sports such as football, tennis and running you may sprain your ankle more often than most. In addition, if you wear shoes that are too loose or have high heels, you may be more susceptible.

TRIGGER POINT SELF TREATMENT TECHNIQUE:
This technique involves locating the heart of the trigger/tender point. When this is compressed it may well trigger a specific referred pain map (preferably reproducing your symptoms). This technique involves applying direct, gentle and sustained pressure to the point:
PROCEDURE:
1. Identify the tender/trigger point you wish to work on (see illustration above).
2. Place the host muscle in a comfortable position, where it is relaxed and can undergo full stretch.
3. Apply gentle, gradually increasing pressure to the tender point until you feel resistance. This should be experienced as discomfort and not as pain.
4. Apply sustained pressure until you feel the tender point yield and soften. This can take from a few seconds to several minutes.
5. Steps 3-4 can be repeated, gradually increasing the pressure on the tender/trigger point until it has fully yielded.
6. To achieve a better result, you can try to change the direction of pressure during these repetitions.
TRIGGER POINT SELF HELP - ADVICE
There are many reasons why you might have trigger points, so it is important to consider your trigger point pain in the context of the rest of your body. It must be stressed that the techniques offered on this page are not a substitute for therapy from a qualified practitioner; although aches and pains from trigger points are common, there can sometimes be an underlying pathology. It is advisable to always seek a proper diagnosis from a qualified medical practitioner or experienced manual therapist.
STRETCHING
Stretching is an important part of the rehabilitation process and should begin as soon as pain allows and be continued throughout the rehabilitation program and beyond - Good maintenance prevents re-injury.
Following an ankle sprain the joint often becomes very stiff and the range of motion at the joint is reduced considerably.
Mobility exercises for the ankle can start very early in the rehabilitation process from day 2 in mild to moderate sprains.
Lateral movements should be avoided in the early stages so as not to put any stress at all on the injured ligaments. Later when pain allows, exercises with lateral movements involving sideways motion can be done.
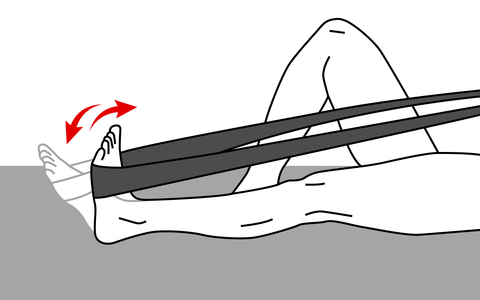
TECHNIQUE
Use the band as shown
-
Loop a resistance band around the forefoot and hold onto the ends
-
Point the foot away slowly allowing it to return to a resting position
-
Aim for 10-20 reps and 3 sets with a short rest in between
-
Once this exercise feels easy, you can increase the strength of the resistance band or progress on to full calf raise exercises
This exercise can be repeated with a bent knee to target the soleus muscle lower down the calf area.
HOW OFTEN?
10-20 reps and 3 sets, twice daily
